Your incubator is full of eggs due to hatch! But how will you know which chick came from the blue eggs and which came from the green or brown eggs if they all begin hatching overnight while no one is watching? Hatch bags are the easiest, least expensive, and most brilliant low-tech answer to this problem! Your chicks will be safe, but she and her shell will be held gently inside the bag until you can remove her and leg band her so you don’t lose track of anyone. Here is how easy it is to use hatch bags in an incubator:
How to Use Hatch Bags Safely in an Incubator
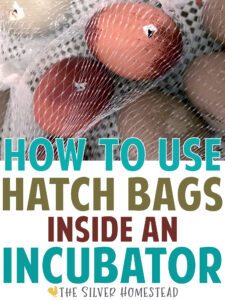
The “hatch bags” I use are nothing more than lightweight mesh produce bags that I purchase from Amazon. They have a wide, breathable, thin plastic netting that stretches so easily chicks can fully escape from their shells and relax inside the bag with plenty of room to breathe and dry off. They do not melt, or even get hot, inside the 100°F incubator and they can be hand washed, air dried and reused dozens of time, which means you only need to purchase them once! (Afflinks)
How Many Eggs Does Each Hatch Bag Hold?
The hatch bags are large. The full size bag can hold a dozen chicken eggs. But it can be a bit tricky to work with such a full hatch bag once the chicks start hatching. I prefer to cut mine in half, which means each bag holds 4-6 chicken eggs or 6-8 quail eggs. I find this to be much more manageable!
How to Use Hatch Bags: Loosely Knot the Ends Closed
To close the hatch bags all you have to do is tie a gentle balloon knot. There is no need to pull it tight since the chicks won’t be able to untie it from inside the bag, no matter how wiggly they get. On the bags that I have cut in half, one will have the heat-sealed plastic end and one will have a knotted end while both have tops that are knotted closed:
Fill Hatch Bags on Lockdown Day, Just Before Hatching
Hatch bags are always filled on lockdown day and never before. For the first two weeks your eggs will incubate normally, turning in the incubator tray as usual. Around Day 18 for chickens and day 15 for quail, I remove the eggs to a towel lined basket, remove the egg turner, lay down the spongy shelf liner that I use as a non-slip mat and then candle the eggs. Any eggs that are quitters are removed.
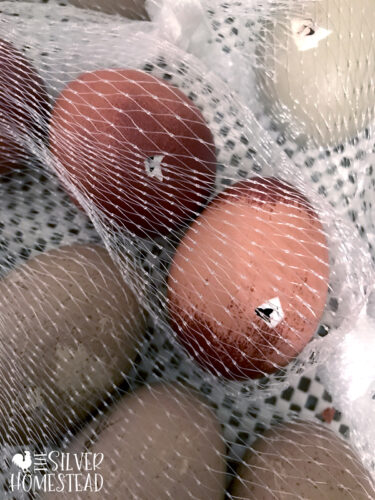
Gently Fill the Hatch Bags
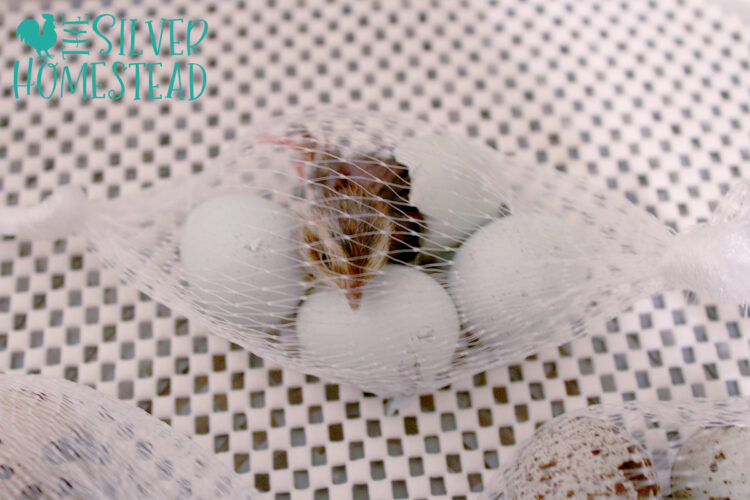
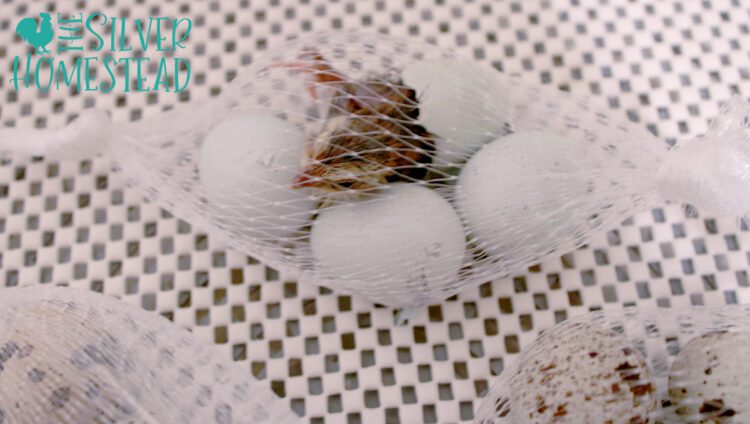
The eggs that look good I very carefully begin to set inside of the hatch bags. To do this I set the empty hatch bag on the bottom of the incubator and gently slide each egg in, positioning it towards the end of the bag. I’ll continue adding the warm eggs very gently until the bag is holding between 3 to 6 eggs that I want to keep together. I’ll lightly knot the end and begin another bag. Sometimes a hatch bag may only be holding one egg because I really do not want to lose track of who is hatching from an amazing color shell! It is better to under-fill the bags and use more than it is to over-fill them and crowd the hatching chicks.
Can Hatch Bags Hurt the Chicks?
I’ve used the same hatch bags for both chicken chicks and Coturnix quail chicks and never had anyone get tangled up, caught or strangled in any way. Not even the teensy quail chicks! They have proven to be very safe and I love that everyone stays separated until I can get the chicks marked, leg banded and recorded. You can see pictures of how I leg band chicken chicks HERE and quail chicks HERE. Free record keeping printables for chickens can be found HERE along with a handy incubator tracking sheet.
Any Special Steps for Using Hatch Bags with Coturnix Quail?
I prefer to use the half-size hatch bags (the ones I cut in half) and I still only fill them with about 6 quail eggs. They work beautifully and the quail chicks can dry off inside them without getting any legs or wings stuck. I’ve had absolutely no issues using them for multiple hatches.
Do Hatch Bags Work for Larger Birds?
Yes they do! Simply fill them with fewer eggs so the larger chicks have room to move. You may want to use the full size produce bag to give turkey poults, ducklings and goslings plenty of space to kick and stretch out.
Hatch Bags Hold Eggs Still
One of the benefits of hatch bags is that the eggs stay more still, instead of being kicked all over the incubator by the chicks who have already hatched out. Just like with all hatching eggs, it is possible for a pipped egg inside a hatch bag to roll over onto the air hole and cover it, which can sometimes smother the chick inside. Checking the hatch periodically to ensure this does not happen, whether using hatch bags or not, is useful. Simply flip any rolled eggs to where the pip hole faces up. Hatch bags really do help hold them upright so the chick can breathe easier!
Hand Wash and Reuse!
The hatch bags are reusable! I hand wash mine with a drop of Peppermint Castile soap or Dawn dish soap, scrubbing them in my hands and then rinsing with plenty of fresh, clean water. I set them on a clean kitchen towel to air dry for several hours. Once dry, they go into a ziplock bag that is closed and kept with my incubator supplies. You only ever need to buy one set – simply wash and reuse!

Plenty to Share!
The hatch bags come in a large quantity so you have enough to share with friends! If you’re a breeder who sells multiple colors of hatching eggs, hatch bags can be a really thoughtful freebie to include with hatching egg orders. Especially if you tuck it into a cute envelope stamped with your farm name!
Any Other Tips?
• While any color plastic mesh produce bag will work, I really do prefer the clear. If a chick is bleeding for any reason the clear bags make it easy to spot, even before I remove her from the bag.
• Do NOT use the fibrous mesh bags that onions and tangerines come in from the grocery store. They are made of a slightly different plastic that can shed pieces which chicks can ingest. You want the plastic mesh bags from Amazon that are boil-proof and do not flake. (Afflink)
This Hatch Bag Trick Works!
I hope this article on how to safely use hatch bags in your incubator has been helpful and given you the confidence to try it for yourself. They really are so handy when it comes to keeping track of which chick hatched from which egg! This is the primary way I’ve been able to improve my record keeping and up my game when it comes to breeding incredible colored egg layers because I know who hatched from the most stunning shells!
You Might Also Enjoy Reading:
Pin for Later:

Have you ever used the hatch bags under a hen at all? We’ve had many failed attempts at incubating expensive eggs (nice development, they just don’t hatch), and I’m just going to put them under a broody girl next time instead. Just wondering if you or someone else has experience trying that out.
Hi Rachel!
I never have used hatch bags under a broody hen. I fear she would either get her toenails caught in the netting and accidentally fling/drag the bag from the nest or not comprehend a chick is hatching in the bag and peck it to death. But if you try it and have success, please do let me know! That would be awesome info to share here!
Chicks who develop but don’t hatch could be drowning in the shells. This means your incubator humidity may be too high and the eggs are not losing enough moisture. Losing an incubator full of expensive hatching eggs is the absolute worst outcome, I am so sorry.
You know, you might try having the broody hen sit on the eggs, then pulling the eggs inside and placing them in hatch bags inside an incubator for the final day of incubation and hatching. As soon as you see one pip in the eggs under the hen, place them in a towel lined basket for transport inside, get them bagged and in a warm, waiting incubator. That way they are hatching in a controlled environment after experiencing a hopefully ideal incubation under the broody hen. I actually would try that!